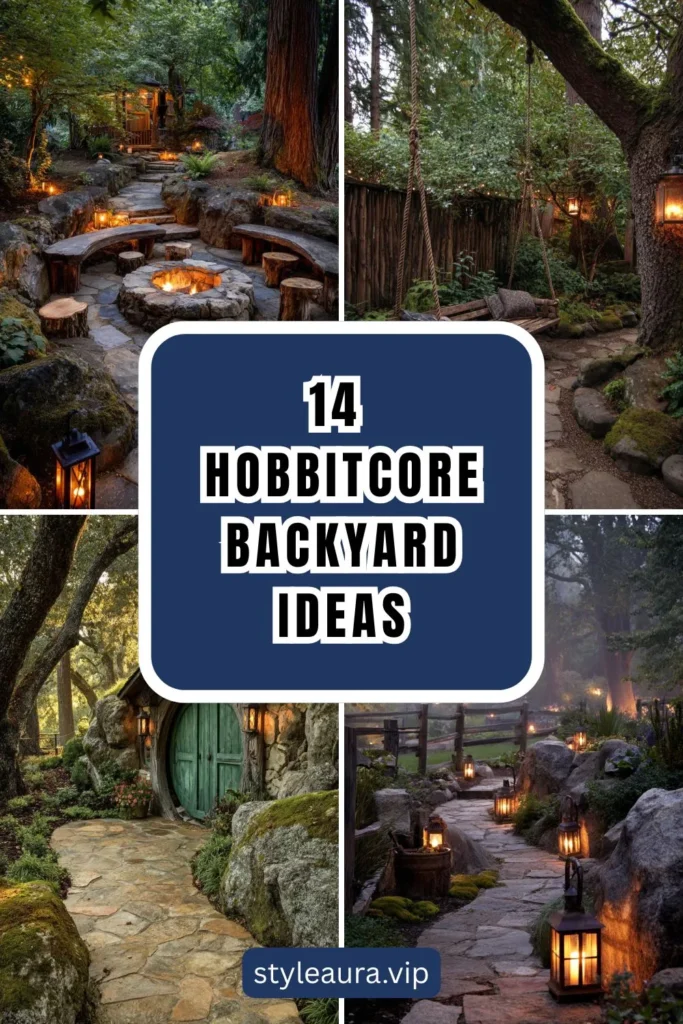
14 Hobbitcore Backyard Ideas for a Magical Outdoor Retreat
Most backyard makeovers start from the same handful of references — a clean modern patio, a manicured lawn, a fire pit surrounded by matching furniture from one catalog page. Open any outdoor inspiration board and the same restrained, symmetrical layouts show up again and again.
That approach skips over a style that’s become one of the most-searched backyard aesthetics around: a garden that looks like it grew on its own, with curved paths, round doors tucked into earth or hillside, and plantings so layered and abundant that the whole yard feels like it was discovered rather than installed.
Hobbitcore isn’t a backyard trend that asks for a tidy lawn and a single accent tree. It asks for abundance, whimsy, and a space that feels like it’s been there for a hundred years.
A hobbitcore backyard is not simply a cottage garden with a few mushroom ornaments scattered in. It has its own structures, its own planting logic, and its own sense of scale — one where a path that curves for no obvious reason and a door built into a hillside aren’t oddities to be explained but the entire point of the design.
Here are 14 ideas for turning a backyard, however large or small, into the kind of magical outdoor retreat this aesthetic is built around.
Why Hobbitcore Plays by Different Rules Than a Standard Backyard
The rules are not the same for every kind of outdoor space:
Standard Backyard Advantages:
- Clean, geometric layouts with clearly defined zones for lawn, patio, and planting beds
- High maintainability, since straight lines and uniform plantings are easier to mow around and trim
- Easy resale appeal, since the layout reads as neutral and broadly conventional
The standard backyard comparison: order as the organizing principle
Hobbitcore Backyard Advantages:
- Abundance and a sense of discovery built into every path and planting bed
- Warmth that comes from texture and material — stone, thatch, weathered wood — rather than from a manicured lawn
- Forgiving of irregularity: a crooked path or an overgrown corner reads as enchanted rather than neglected
The key insight:
- A standard backyard rewards straight lines and clear sightlines
- A hobbitcore backyard rewards curves, layers, and a few deliberately hidden surprises
- These are different design philosophies, not the same yard with a round door added
The Scale and Layering Reality
The most important design decision in a hobbitcore backyard:
The path logic:
- Paths curve, narrow, and occasionally disappear behind plantings rather than running in straight, fully visible lines
- A path that reveals the whole yard at a glance undercuts the sense of discovery the whole style depends on
- Know this — it governs how every other element in the yard gets arranged around it
The “layer over clear” calculation:
- A backyard with three or four plant heights — groundcover, mid-height shrub, small tree — reads as a forest edge; one mowed lawn with a border reads as a standard yard
- Where a clear sightline feels necessary, a single curve or a planted screen breaks it up rather than removing it entirely
- Most hobbitcore yards favor more planting and less open lawn than a standard backyard would default to
Most hobbitcore backyards build in stages, not all at once:
- Structural elements — a round door feature, a stone path, a pergola — come first, since they’re hardest to change later
- Planting comes next, since it needs a season or more to fill in and start looking established
- The smallest finishing touches — lanterns, garden ornaments, a hanging swing — come last, and are the easiest layer to add or adjust at any point
1. The Round Door Garden Feature (The Aesthetic’s Signature Element)
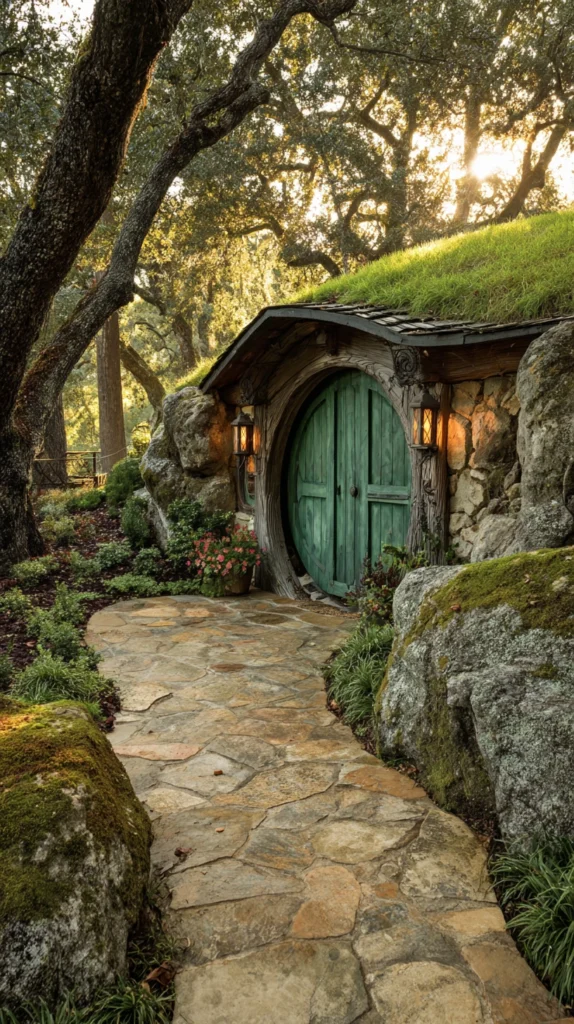
A round door, real or purely decorative, built into a hillside, a garden wall, or a freestanding mound — the single feature most responsible for announcing the whole style before a guest has noticed a single plant.
Why this one element matters more than any other single choice
- The instant-recognition effect: a round door reads as this aesthetic immediately, the way a white picket fence reads as classic Americana
- The whimsy-anchor function: every other idea on this list can be more subtle because this one feature is doing the heavy lifting of announcing the theme
- The flexible scale: this idea works as a small decorative accent on a garden shed or as a full structural feature built into a real earthen mound, depending on budget and space
The options
- A decorative round door mounted on a flat garden wall or fence, the lowest-commitment version, purely ornamental
- A round door built into a small earthen mound or berm, with the door leading to a real storage space or simply standing alone
- A round door on an existing shed, replacing a standard rectangular door with a custom-built circular one
- A round window paired with the door, reinforcing the shape and adding a second focal point nearby
The practical execution
- A purely decorative door can be built from exterior-grade plywood and trim, mounted flush against an existing wall or fence
- A functional door built into an earthen mound requires real structural framing and waterproofing, best suited to a larger project with professional input
- Paint or stain the door a deep, saturated color — forest green, deep blue, weathered red — to make it stand out against the surrounding greenery
Cost breakdown
- Decorative round door, DIY materials: $80–200
- Custom-built functional door with framing: $500–1,500
- Earthen mound construction, if building from scratch: $800–3,000+
- Total: $80–3,000+, depending on whether it’s decorative or structural
The round door tucked into a corner of the yard: the one feature that tells a guest what kind of garden they’re walking into before they’ve seen anything else.
2. The Curved Stone or Gravel Path (A Walk That Reveals the Garden Slowly)
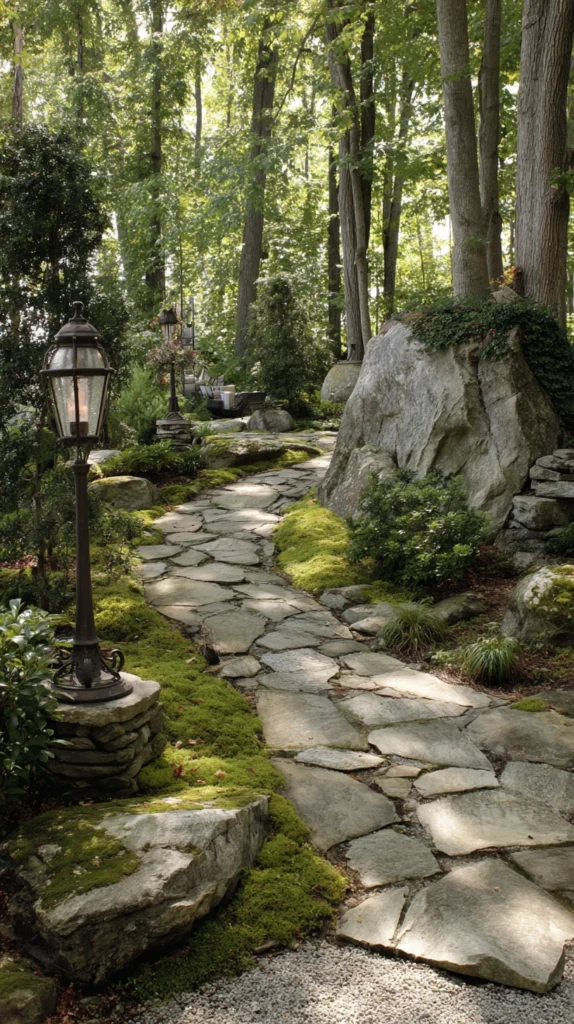
A winding path of irregular flagstone, gravel, or packed earth, curving through the yard rather than running in a straight line — the structural detail that controls how the entire garden is experienced, step by step.
Why a curved path matters more than the materials it’s made from
- The pacing it creates: a curved path slows down how quickly a visitor takes in the yard, revealing one section at a time rather than the whole space at once
- The exploration cue: a path that disappears around a planting or a small rise invites someone to keep walking, the same way a closed door invites someone to open it
- The material variety it allows: a curved, informal path can mix stone, gravel, and groundcover in a way a straight, formal path rarely can without looking inconsistent
The options
- Irregular flagstone, set with gaps for moss or creeping groundcover to fill in over time
- Packed gravel or crushed stone, a lower-cost option that still reads as informal and natural
- A mixed path, alternating flagstone stepping points with gravel infill between them
- A packed earth or mulch path, the lowest-cost option, suited to a more woodland-style section of the yard
The practical execution
- Lay the path with at least one full curve or bend, even in a small yard, rather than a straight line from one point to another
- Vary the spacing and size of flagstones slightly rather than using a uniform grid, to reinforce the sense of an old, worn path
- Allow moss, thyme, or other low groundcover to grow into the gaps over a season or two rather than keeping every gap clean and gravel-filled
Cost breakdown
- Gravel path, materials per linear foot: $3–8
- Flagstone path, materials per linear foot: $10–25
- Professional installation, a modest path: $500–2,000
- Total: $200–2,500, depending on length and materials
3. The Thatched or Living Roof Structure (Architecture That Looks Grown, Not Built)
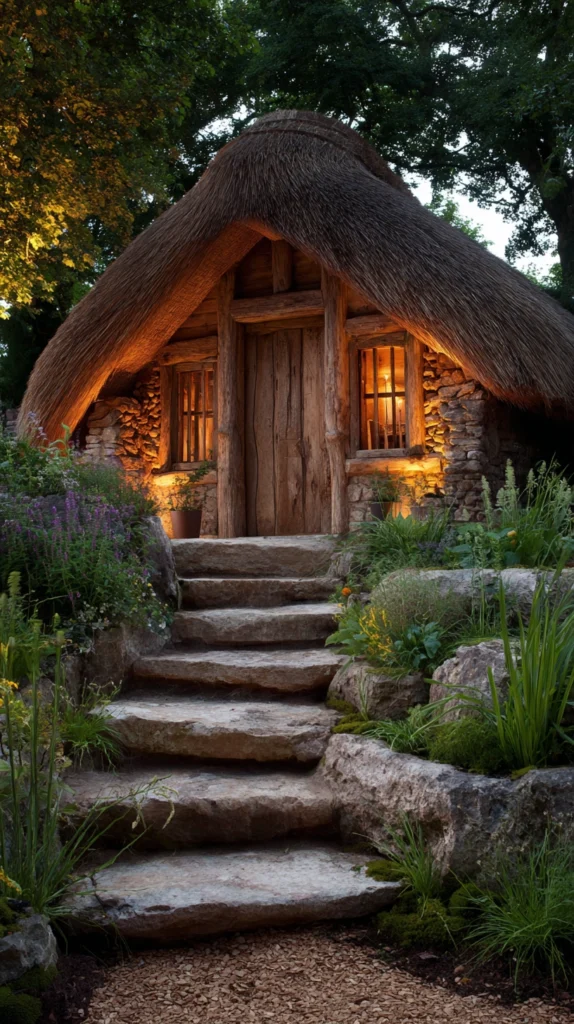
A small garden structure — a shed, an arbor, or a freestanding nook — topped with a thatched roof or a living roof of sedum and groundcover, rather than standard shingles.
Why the roofline does more work than the walls beneath it
- The silhouette it creates: a thatched or planted roof changes a structure’s outline more than almost any other single choice, softening straight roof lines into something closer to a hillside
- The material honesty principle: thatch and living roofs are materials that age and change with the seasons, reinforcing the sense of a structure that’s settled into the landscape rather than been recently installed
- The small-structure value: even a modest shed or arbor becomes a genuine focal point once its roofline is treated this way
The options
- A true thatched roof, using reed or straw thatching, the most authentic and most maintenance-intensive option
- A faux thatch roofing product, synthetic materials built to mimic the look of thatch with far less upkeep
- A living roof of sedum or low groundcover, planted over a waterproofed roof structure
- A roof partially covered in moss or planted containers, a lower-commitment version of a true living roof
The practical execution
- Real thatch requires a steeper roof pitch than standard shingles to shed water properly, which matters for any new structure being designed from scratch
- A living roof needs a properly waterproofed membrane underneath the growing medium, not something to improvise without research or professional input
- Faux thatch products are the realistic choice for most backyard sheds, since they install similarly to standard roofing without the specialized skill true thatching requires
Cost breakdown
- Faux thatch roofing for a small shed: $400–1,200
- True thatched roof, materials and skilled labor: $2,000–6,000+
- Living roof system, materials and waterproofing: $1,000–3,500
- Total: $400–6,000+, depending on the route taken
4. The Layered Cottage Garden Beds (Abundance Instead of a Lawn Border)
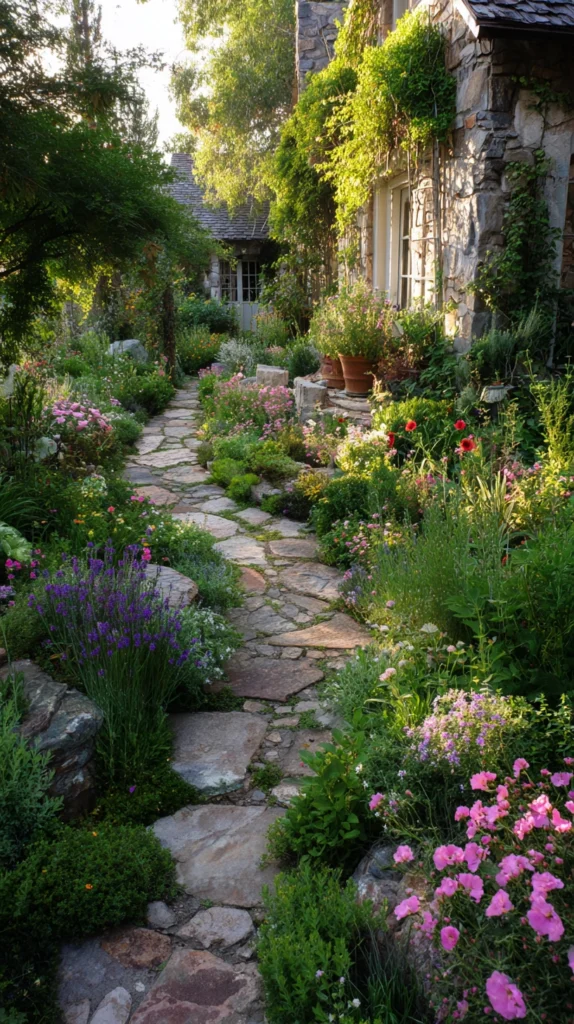
Densely planted garden beds mixing flowers, herbs, and small shrubs in layered heights — the planting approach that replaces a single tidy border with something closer to abundant, slightly wild growth.
Why dense, layered planting matters more than any individual flower
- The abundance signal: a single row of evenly spaced flowers reads as landscaped; an overflowing, multi-height bed reads as a garden that’s grown on its own terms
- The texture and color variety: layering tall flowering plants behind mid-height shrubs and low groundcover creates depth no single-height border can match
- The forgiving maintenance curve: a layered, slightly wild bed tolerates an uneven trim or a late-season die-back far better than a tightly manicured border, which shows every imperfection
The options
- A cottage garden mix, combining foxglove, delphinium, and lupine for height with lower-growing geranium and lady’s mantle filling in beneath
- An herb-forward bed, mixing culinary and ornamental herbs like lavender, sage, and chamomile for both scent and color
- A native wildflower mix, suited to a lower-maintenance, regionally appropriate version of the same layered effect
- A shade-tolerant version, using ferns, hosta, and woodland groundcover for beds that don’t get full sun
The practical execution
- Plant in informal drifts rather than straight rows, letting plant groupings curve and overlap slightly at their edges
- Choose at least three height tiers for any given bed — tall background plants, mid-height fillers, and a low groundcover edge
- Let some self-seeding and spreading happen naturally rather than editing every bed back to a uniform shape each season
Cost breakdown
- Perennial plants, per plant: $6–15
- A fully planted bed (15–20 plants): $150–350
- Total: $150–350 per bed, with cost scaling by the number of beds planted
5. The Moss and Stone Garden Nook (A Quiet Corner Built From Texture Alone)
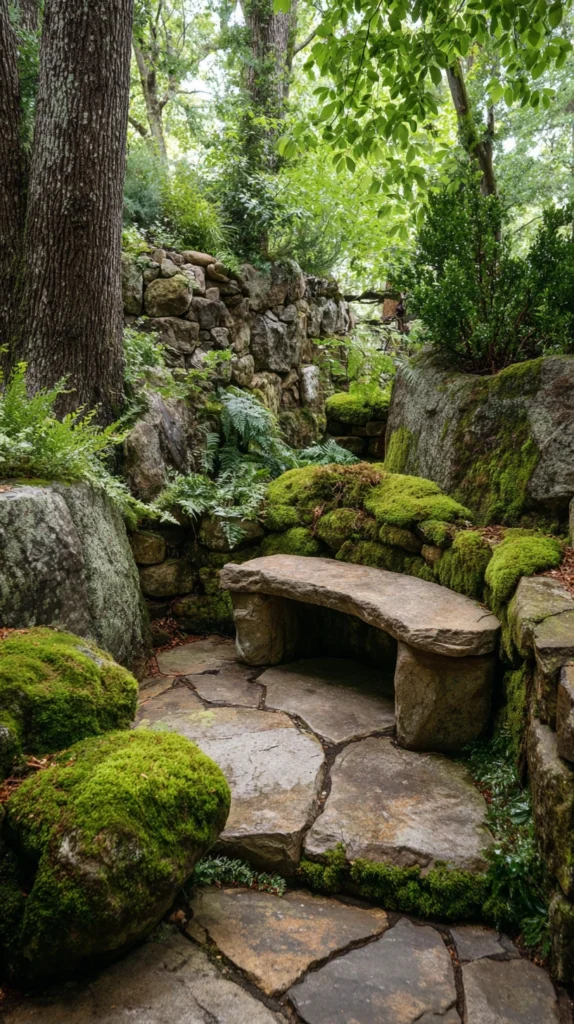
A small seating or contemplation nook built from moss-covered stone, tucked into a shaded or partially hidden corner of the yard — the idea that proves a single corner can carry the whole aesthetic without a single flower.
Why texture alone can carry an entire corner of the yard
- The shade-solution it offers: most yards have at least one corner too shaded for the layered planting from Idea #4, and moss and stone thrive in exactly that kind of low light
- The aged, settled look it produces almost immediately: moss-covered stone reads as old and established far faster than most new plantings do, which matters in a style built around the appearance of age
- The low-maintenance payoff: once established, a moss and stone nook needs very little upkeep compared to a flowering bed in the same square footage
The options
- A simple stone bench, surrounded by moss-covered boulders or stepping stones
- A small stacked-stone nook or alcove, built into a slope or existing garden wall
- A moss-carpeted clearing, with a single stone seat or low table at its center
- A miniature stone arch or threshold, marking the entrance to the nook as its own small destination
The practical execution
- Choose a site with consistent shade and moisture, since moss needs both to establish and spread successfully
- Encourage moss growth on stone by keeping the surface consistently damp in its first season, using a light misting if natural rainfall isn’t sufficient
- Avoid walking directly on established moss patches, reserving stepping stones for any path through the nook itself
Cost breakdown
- Stone bench or seating boulder: $100–400
- Stacked stone for a small nook: $200–600
- Moss starter or transplant material: $20–60
- Total: $200–900
6. The Hanging Garden Swing or Hammock (Rest Built Into the Landscape)
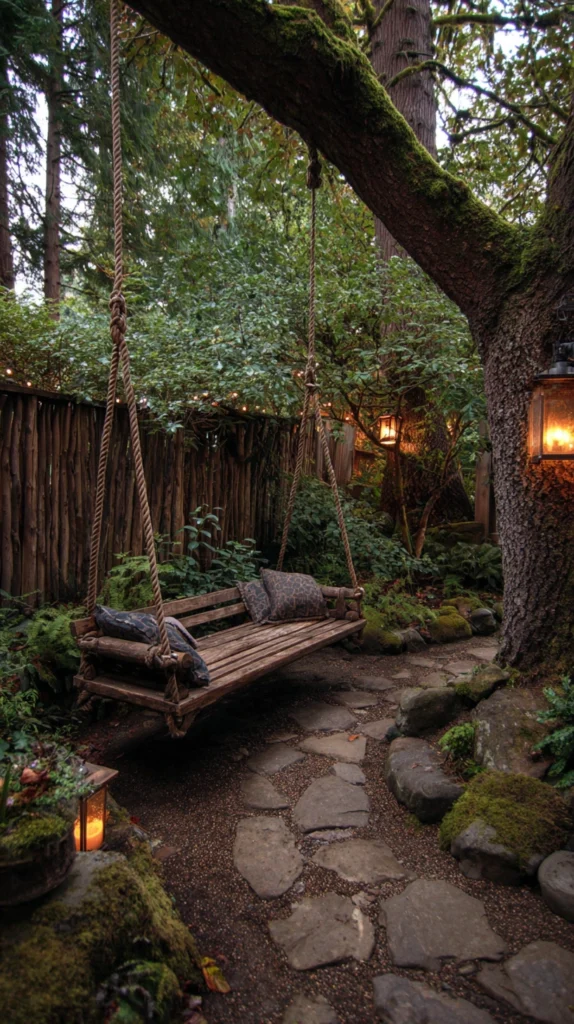
A wooden swing or woven hammock, hung from a sturdy tree branch or a freestanding frame, tucked into a planted or partially shaded corner — the resting spot that gives the whole garden somewhere to actually sit and stay a while.
Why a swing belongs in this style specifically
- The slow-living signal: a hanging swing or hammock suggests a yard meant for lingering, not just walking through, which matches the unhurried feeling the whole aesthetic is built around
- The natural integration: unlike a standalone bench, a swing hung from an existing tree becomes part of the landscape rather than an added object placed on top of it
- The photo-moment and use-moment overlap: this is consistently one of the most-used and most-photographed spots in a finished hobbitcore yard, doing double duty as both function and focal point
The options
- A wooden plank swing, hung from heavy rope or chain from a mature tree branch
- A woven rattan or macramé hammock chair, for a softer, more textured look than a flat plank swing
- A freestanding wooden swing frame, for yards without a tree branch sturdy enough to support one
- A double hammock, strung between two trees for a more substantial resting spot
The practical execution
- Confirm any tree branch used for hanging is genuinely sturdy enough for the swing’s intended weight load, not just visually large
- Position the swing where it’s partially screened by surrounding planting, rather than in the most open, exposed part of the yard
- Use weather-resistant rope, chain, or hardware rated for outdoor use, since this piece stays exposed through every season
Cost breakdown
- Wooden plank swing, materials: $40–120
- Rattan or macramé hammock chair: $60–150
- Freestanding swing frame: $200–500
- Total: $40–500, depending on whether an existing tree can be used
7. The Vegetable and Herb Garden Plot (A Working Garden, Not Just a Decorative One)
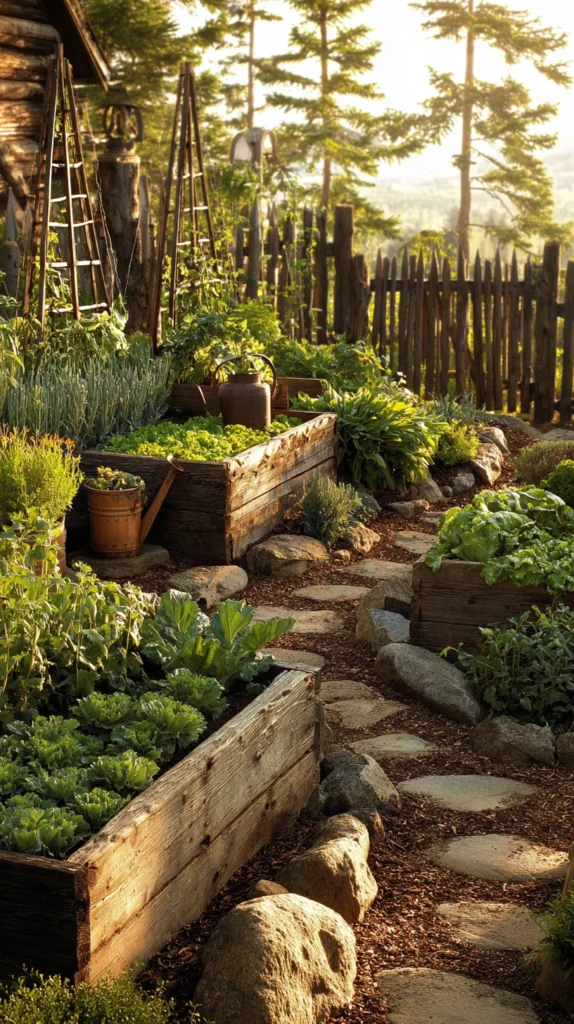
A dedicated vegetable and herb growing area, laid out with raised beds or in-ground rows — the section of the yard that ties the whole aesthetic back to its roots in self-sufficiency and a close relationship with food.
Why a working garden plot matters to the whole concept
- The self-sufficiency reference point: this entire style draws on an image of a home that grows much of what it eats, and an ornamental-only yard misses that connection
- The seasonal change it brings: unlike most of the structural ideas on this list, a vegetable plot visibly changes through the year, giving the yard a sense of real time passing
- The texture and color it adds: rows of leafy greens, climbing beans, and flowering herbs add a different kind of texture than ornamental beds alone provide
The options
- Raised wooden beds, the most controlled option, good for yards with poor native soil
- In-ground rows, lower-cost but more dependent on existing soil quality
- A mixed kitchen garden, combining vegetables, herbs, and a few cutting flowers in the same beds
- A small espaliered fruit tree or trellised vine, added along a fence or wall edge of the plot for vertical interest
The practical execution
- Position the plot in the yard’s sunniest available spot, since most vegetables need significantly more direct sun than the shade-tolerant plantings elsewhere in the yard
- Build raised beds from untreated or naturally rot-resistant wood, given how close the growing medium sits to whatever the bed is built from
- Rotate crops between seasons within the same beds to keep the soil productive over multiple years
Cost breakdown
- Raised bed kit, per bed: $80–200
- Soil and compost to fill beds: $30–80 per bed
- Seeds and starts for a full season: $30–70
- Total: $150–350 per bed, with cost scaling by the number of beds built
8. The Wildflower Meadow Patch (Lawn Replaced With Something Alive)
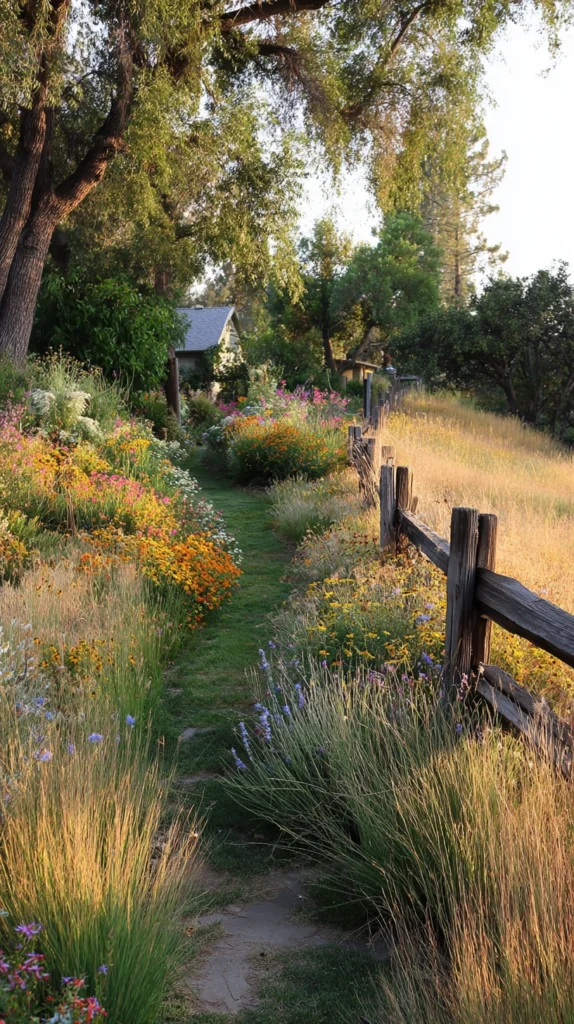
A section of lawn converted into a wildflower meadow, left to grow taller and bloom rather than being mowed weekly — the idea that turns the most conventional part of most backyards into one of its most distinctive.
Why a meadow patch does more than a flowering border
- The lawn-replacement logic: a standard mowed lawn is one of the least aesthetic-appropriate features a backyard can have, and converting even a section of it does more to shift the yard’s overall feel than almost any other single change
- The movement and life it brings: a wildflower patch moves with the wind and draws pollinators in a way a mowed lawn simply doesn’t, adding a sense of the yard being alive rather than maintained
- The lower-maintenance trade: once established, a meadow patch needs significantly less mowing and watering than the lawn it replaced
The options
- A regional native wildflower seed mix, suited to the specific climate and requiring the least ongoing intervention
- A mixed annual and perennial meadow blend, for faster first-year color while perennials establish underneath
- A meadow path mowed through the middle, allowing access and a clear walking route through an otherwise unmowed patch
- A meadow bordered by a low mowed edge, signaling the unmowed area is intentional rather than simply neglected
The practical execution
- Choose a seed mix specifically suited to the region’s climate and soil rather than a generic blend, for the best establishment odds
- Mow a clear border or path around the meadow patch to visually frame it as a deliberate feature
- Expect the patch to look sparse in its first season and fuller by the second or third, since many wildflower mixes take more than one year to fully establish
Cost breakdown
- Wildflower seed mix, per 1,000 square feet: $30–80
- Soil preparation, if needed: $0–150
- Total: $30–230, depending on existing soil condition
9. The Lantern-Lit Garden Path (Light That Belongs to the Story, Not Just Safety)
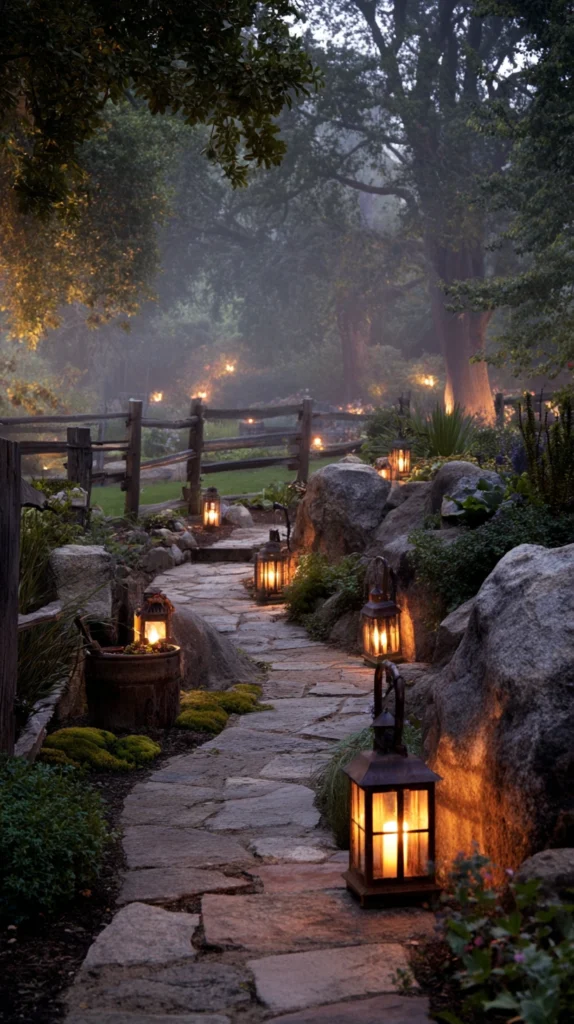
Small lanterns or low path lights placed along the curved path from Idea #2, styled to look like they belong to the garden’s world rather than a standard hardware store landscape light.
Why the lighting style matters as much as the placement
- The immersion it protects: a row of identical modern solar stake lights can undercut the whole aesthetic faster than almost any other single misstep, since lighting style reads instantly even from a distance
- The function it still has to serve: like any path light, this layer needs to genuinely help someone navigate the curved path safely after dark, not just look the part
- The warm-glow reinforcement: warm, low lantern light extends the cozy, lived-in feeling of the rest of the yard into the evening hours, when the garden is seen differently than in daylight
The options
- Small wrought iron or aged-metal lanterns, staked along the path at intervals
- Mushroom-shaped path lights, leaning directly into the whimsical side of the aesthetic
- Solar-powered lanterns with a warm, flickering LED, combining low-maintenance power with an authentic flame-like look
- Hanging lanterns, suspended from low branches or a simple post rather than staked directly into the ground
The practical execution
- Space lights close enough together that no stretch of the path is left fully dark, while still leaving some shadow between them for atmosphere
- Choose fixtures with a weathered, aged finish rather than anything glossy or obviously new, even if the light itself is solar or battery-powered
- Position lights just off the path’s edge rather than directly in it, so they illuminate the way without becoming an obstacle
Cost breakdown
- Small aged-metal or mushroom-style lanterns, each: $15–35
- A set of 6–8 for a full path: $90–250
- Total: $90–250
10. The Stacked Stone Wall or Border (A Boundary That Looks Like It’s Always Been There)
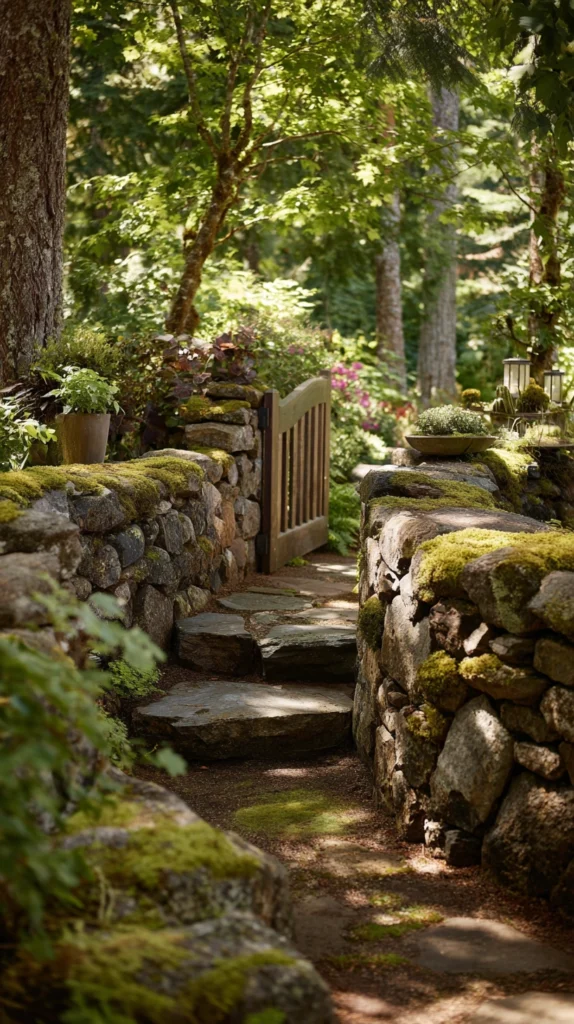
A low, dry-stacked stone wall, used to edge a garden bed, mark a path, or define the boundary of a section of yard — the structural element that gives the whole space a sense of having been built up over generations rather than installed in a weekend.
Why a stone wall reads differently than a fence or modern edging
- The permanence and age signal: stacked stone, even newly built, reads as older and more settled than wood fencing or plastic landscape edging
- The functional flexibility: a low stone wall can edge a bed, retain a slope, or simply mark a boundary, doing several jobs other materials would need separate solutions for
- The texture contribution: stone adds a rough, varied surface that contrasts naturally with the soft plantings and curved paths elsewhere in the design
The options
- A dry-stacked fieldstone wall, built without mortar, the most traditional and most labor-intensive option
- A mortared stone wall, more stable and lower-maintenance, at the cost of some of the informal, hand-built look
- Stacked stone used as a low garden bed border, a smaller-scale version requiring less material and labor
- A reclaimed or salvaged stone wall, sourced from old building material for genuine age and character
The practical execution
- Build on a compacted gravel base for proper drainage, especially for any wall taller than a single course or two
- Choose irregular, varied stone sizes rather than uniform blocks, for a more natural, hand-built appearance
- Keep wall height modest for a DIY build — anything retaining significant soil or built above a couple of feet benefits from professional engineering input
Cost breakdown
- Low garden bed border, DIY materials: $150–400
- A more substantial dry-stacked wall, materials and labor: $1,000–3,000+
- Total: $150–3,000+, depending on scale
11. The Whimsical Garden Ornaments (Small Details That Reward a Closer Look)
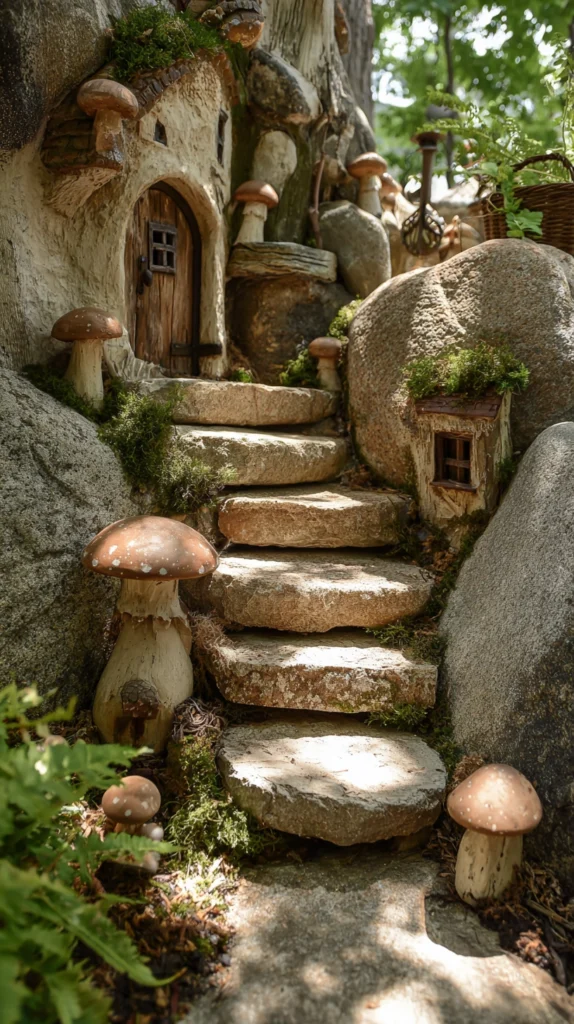
Small carved or cast garden ornaments — mushrooms, woodland creatures, tiny doors at the base of a tree — tucked throughout the planted beds and along the path, rewarding a visitor who actually slows down to look closely.
Why small ornaments matter even in a yard full of bigger features
- The discovery-reward function: this aesthetic depends on a sense that the garden holds more than what’s visible at first glance, and small hidden ornaments are the most direct way to deliver that feeling
- The scale variety it introduces: after the larger structural features on this list, small ornaments add a layer of detail working at a completely different scale, the way a console vignette works after a room’s furniture is set
- The low individual cost, high cumulative effect: no single ornament costs much, but a yard with several thoughtfully placed pieces feels far more layered than one with none at all
The options
- A miniature door set into the base of a tree, suggesting a tiny unseen resident
- Carved or cast mushroom ornaments, scattered in small clusters rather than evenly spaced
- Small woodland creature statues, tucked partially behind foliage rather than displayed in the open
- A tiny signpost or marker, with a whimsical direction or distance painted on
The practical execution
- Place ornaments where they’re partially obscured by planting, so finding them feels like a discovery rather than an obvious display
- Vary the placement height, with some low to the ground and others slightly elevated on a stump or stone, for visual variety
- Choose weather-resistant materials — cast resin, treated wood, or metal — since these small pieces stay outside through every season
Cost breakdown
- Small individual ornament: $10–30
- A collection of 5–8 pieces: $60–180
- Total: $60–180
12. The Climbing Vine and Living Archway (A Threshold Made of Growth)
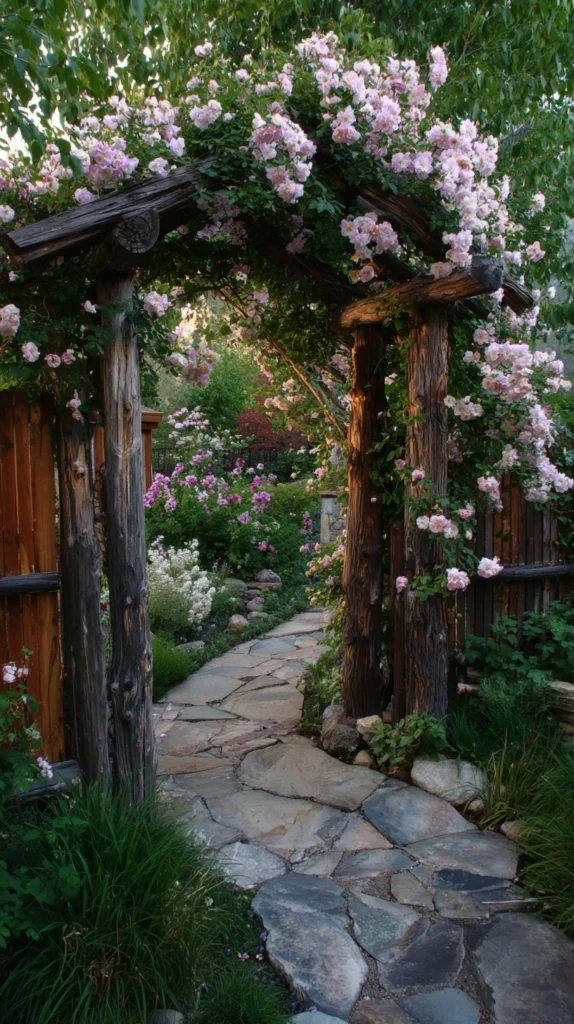
A wooden or metal archway planted with a climbing vine — wisteria, climbing rose, or clematis — positioned at the entrance to a path, garden bed, or seating area, creating a threshold made from living material rather than a built one alone.
Why an archway changes how a space feels entered
- The threshold effect: walking under an archway, especially one wrapped in greenery, creates a clear sense of crossing from one part of the yard into another, reinforcing the layered, discovery-driven feeling the whole design is built around
- The vertical green it adds: most backyard planting happens at ground level, and a climbing vine introduces height and texture that beds and borders alone can’t provide
- The seasonal change it brings: a flowering vine like wisteria or climbing rose transforms dramatically through the year, giving the archway a different character in spring bloom versus its bare winter structure
The options
- A wooden arbor, planted with climbing roses for color and fragrance
- A metal arch frame, planted with wisteria for dramatic, heavy seasonal blooms
- A rustic branch or willow archway, built from natural materials for a more woodland, less manufactured look
- A double arch tunnel, for a longer planted walkway rather than a single threshold point
The practical execution
- Choose a vine appropriate to the climate and the arch’s structural capacity, since some climbing plants, wisteria especially, become quite heavy as they mature
- Train new growth along the arch’s structure in its early seasons, since most climbing vines need some initial guidance before they take over on their own
- Position the arch at a genuine transition point in the yard’s layout, such as the entrance to the path from Idea #2, rather than as an isolated standalone feature
Cost breakdown
- Wooden or metal arbor kit: $150–400
- Climbing vine or rose plants: $20–50
- Total: $170–450
13. The Outdoor Fire Feature With Stone Surround (Gathering Around Warmth, Cottage-Style)
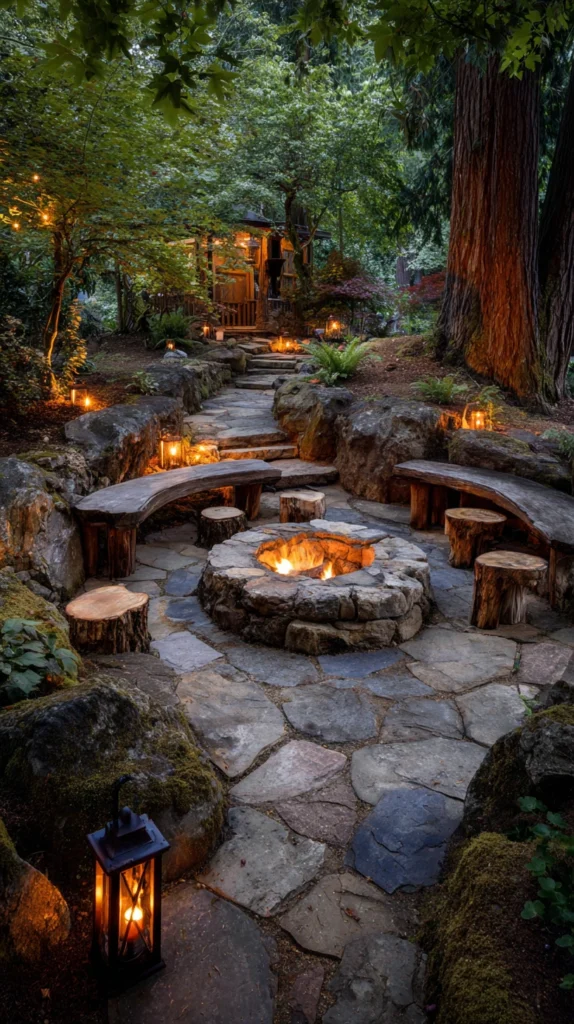
A small fire pit or chiminea, set within a stone surround and seating area, designed to look like a built-in part of the landscape rather than a portable accessory placed on a patio.
Why the fire feature needs its own design treatment in this style
- The gathering-point function carried over from the broader aesthetic: a fire feature gives the magical, abundant garden somewhere to actually sit and linger after dark, much like the swing from Idea #6 does during the day
- The stone-and-fire material pairing: stone surrounds and a wood fire share the same sense of age and permanence the rest of the yard is built around, unlike a modern metal fire bowl placed on a bare patio
- The seasonal extension it provides: a well-built fire feature extends how late into the year the garden gets used, since cooler evenings no longer mean retreating indoors
The options
- A stacked stone fire pit, built using the same techniques and materials as the wall from Idea #10
- A chiminea, a freestanding clay or cast iron fireplace, offering a more contained flame and a distinctive silhouette
- A small stone hearth with built-in seating, the most substantial version, combining the fire feature directly with permanent seating
- A simple in-ground fire ring, the lowest-cost option, still benefiting from a stone edge to match the rest of the yard
The practical execution
- Check local fire ordinances and seasonal burn restrictions before building any wood-burning feature
- Position the fire feature near, but not directly beside, the densest plantings or the living archway, to avoid fire risk to surrounding growth
- Surround with informal stone seating or logs rather than matched modern furniture, to keep the area consistent with the rest of the yard’s style
Cost breakdown
- Chiminea: $100–300
- Stacked stone fire pit, DIY: $200–500
- Stone hearth with built-in seating, professional build: $2,000–5,000+
- Total: $100–5,000+, depending on the route taken
14. The Birdhouse and Wildlife Habitat Cluster (Inviting the Garden’s Other Residents)
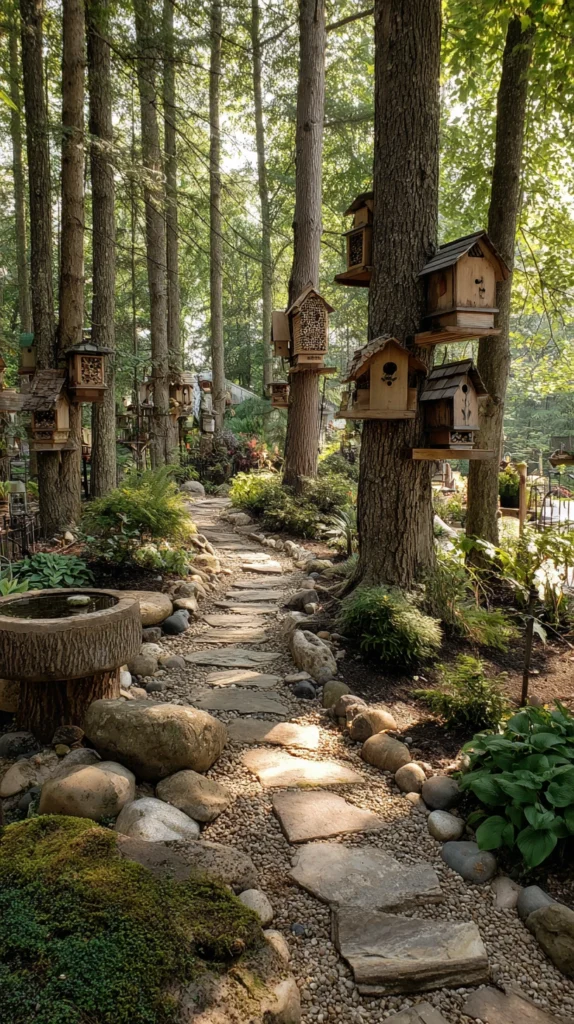
A cluster of birdhouses, bee hotels, and small wildlife shelters, placed throughout the yard’s planted areas — the idea that extends the sense of a living, inhabited garden beyond the human visitors to the actual wildlife that calls it home.
Why inviting wildlife matters to the whole concept
- The lived-in-by-more-than-people principle: this aesthetic is built around the idea of a garden that’s part of a larger, thriving natural world, and visible wildlife habitat reinforces that more directly than any ornament can
- The pollinator and ecosystem benefit: bee hotels and diverse plantings genuinely support local pollinator populations, giving this idea real ecological value beyond its visual contribution
- The seasonal activity it brings: birds, bees, and other small wildlife visiting these habitats add movement and life to the yard that static decor alone never could
The options
- Small wooden birdhouses, mounted on posts or hung from tree branches at varied heights throughout the yard
- A bee hotel, a small structure of hollow tubes or drilled wood blocks, supporting native solitary bee species
- A butterfly house, a narrow slatted box offering shelter for overwintering butterflies
- A small water feature or shallow dish, providing drinking water for birds and pollinators alike
The practical execution
- Position birdhouses away from the most heavily trafficked paths and seating areas, giving wildlife some genuine distance from regular human activity
- Mount bee hotels in a sunny, sheltered spot, since most native bee species need warmth and protection from wind to use them successfully
- Clean and maintain birdhouses and bee hotels seasonally, since unmaintained structures can become less effective or even harmful to the wildlife they’re meant to support
Cost breakdown
- Wooden birdhouse, each: $15–40
- Bee hotel: $20–50
- A small water feature or dish: $15–40
- Total: $50–130 for a starter cluster
The birdhouse swaying slightly in a tree branch, with a bee hotel tucked nearby: the smallest, quietest sign that the garden belongs to more than just the people who built it.
The Hobbitcore Backyard Roadmap
The work, sequenced:
Phase One (the structural anchors):
- The round door garden feature (#1)
- The curved stone or gravel path (#2)
- The thatched or living roof structure (#3)
- The outdoor fire feature with stone surround (#13)
Phase Two (the planting foundation):
- The layered cottage garden beds (#4)
- The wildflower meadow patch (#8)
- The vegetable and herb garden plot (#7)
- The stacked stone wall or border (#10)
Phase Three (the gathering spots):
- The moss and stone garden nook (#5)
- The hanging garden swing or hammock (#6)
- The climbing vine and living archway (#12)
Phase Four (the finishing layers):
- The lantern-lit garden path (#9)
- The whimsical garden ornaments (#11)
- The birdhouse and wildlife habitat cluster (#14)
Getting Started This Weekend
The immediate-impact backyard refresh:
One weekend, three changes:
- Hang a hammock or simple swing from an existing tree (Idea #6)
- Tuck a few small mushroom or woodland ornaments into an existing bed (Idea #11)
- Add a birdhouse and a bee hotel to a quiet corner (Idea #14)
Total cost: $90–200. Time: an afternoon. The yard will feel different by the following weekend, without a single structural change.
The structural investment (the next big project):
The curved stone or gravel path (Idea #2) is the single most important project on this list, if the yard doesn’t already have one. Once it’s in place, the round door, the planting beds, and the lantern lighting all have a route to arrange themselves around — much like the fire pit anchors a backyard gathering elsewhere, the path anchors the entire experience of moving through this kind of garden.
What a finished hobbitcore backyard provides that a standard yard can’t:
The sense that the garden grew rather than was installed:
- A path that curves and disappears, controlling how the whole space gets revealed
- Planting beds layered with enough height and density to feel like a forest edge, not a border
- A wall or archway that looks like it’s stood for decades, even when it’s brand new
The warmth that comes from texture and material, not a manicured lawn:
- Stone and moss that age and change rather than needing weekly mowing
- A fire feature that extends the garden’s use long after the sun goes down
- A swing or hammock that gives the whole yard somewhere to actually slow down and stay
The sense of a garden inhabited by more than just its visitors:
- A birdhouse cluster and bee hotel that bring real movement and life to the space
- Small ornaments tucked into the planting, rewarding anyone who looks closely
- A wildflower patch that moves with the wind in a way a mowed lawn never will
A hobbitcore backyard isn’t a standard yard with a few whimsical objects added on top. It’s a different relationship with the outdoor space entirely — curves over straight lines, abundance over a manicured border, a garden that invites slow exploration rather than a single glance from the patio door. Every plant left to spread a little past its bed makes the next one look more at home. Every lantern lit along the path at dusk is one more reminder that the garden is still doing exactly what it was built to do — feel like it’s always been there.