13 Creative Mid Century Modern Backyard Ideas on a Budget
Mid-century modern wasn’t originally a design movement for people with unlimited budgets. It was postwar suburban housing, built fast and affordably, furnished by companies trying to make good design accessible to a rapidly growing middle class.
Somewhere along the way, original Eames chairs and vintage Heywood-Wakefield credenzas turned the whole aesthetic into something that reads as expensive and exclusive. But the actual design principles underneath it, clean lines, natural materials, functional simplicity, geometric structure, were never inherently costly to begin with.
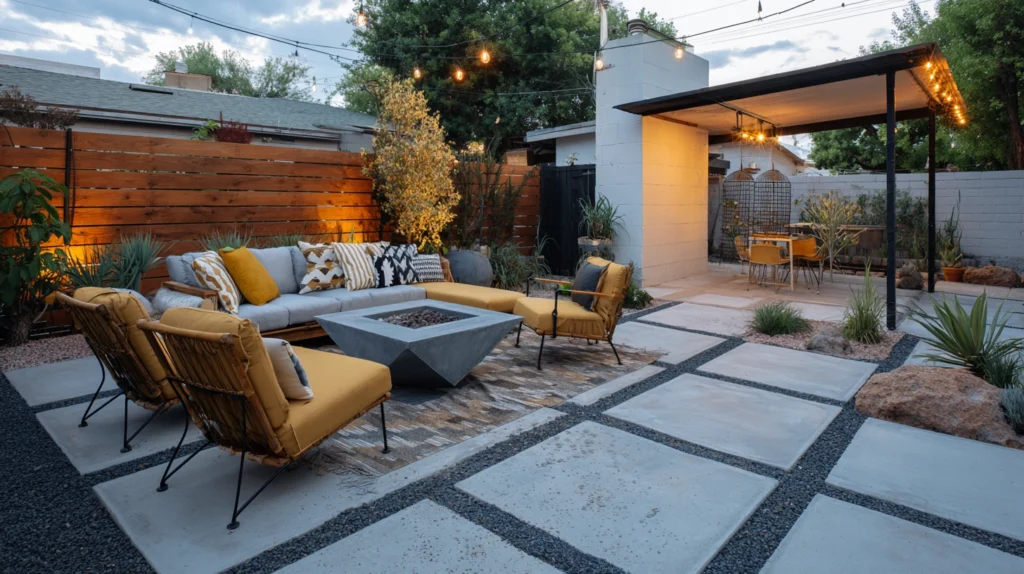
A backyard built around those same principles doesn’t need a five-figure landscaping budget. It needs the right shapes, the right materials, and a willingness to source secondhand rather than new.
Here are 13 ways to bring genuine mid-century modern character into a backyard without spending like it’s 1962 and money was no object.
Why mid-century modern actually suits a tight budget better than most other styles
The aesthetic’s core principles align naturally with affordable materials and DIY-friendly construction.
- Clean geometric shapes are often easier and cheaper to build than ornate, detailed alternatives
- The style favors exposed, honest materials like plain wood and concrete rather than expensive finishes designed to look like something else
- Many defining mid-century outdoor elements, like breeze blocks or simple slatted screens, were originally mass-produced specifically to be affordable
Once you understand which shapes and materials actually define the look, recreating it on a budget becomes a much more approachable project.
1. A Concrete Paver Patio in a Simple Geometric Grid
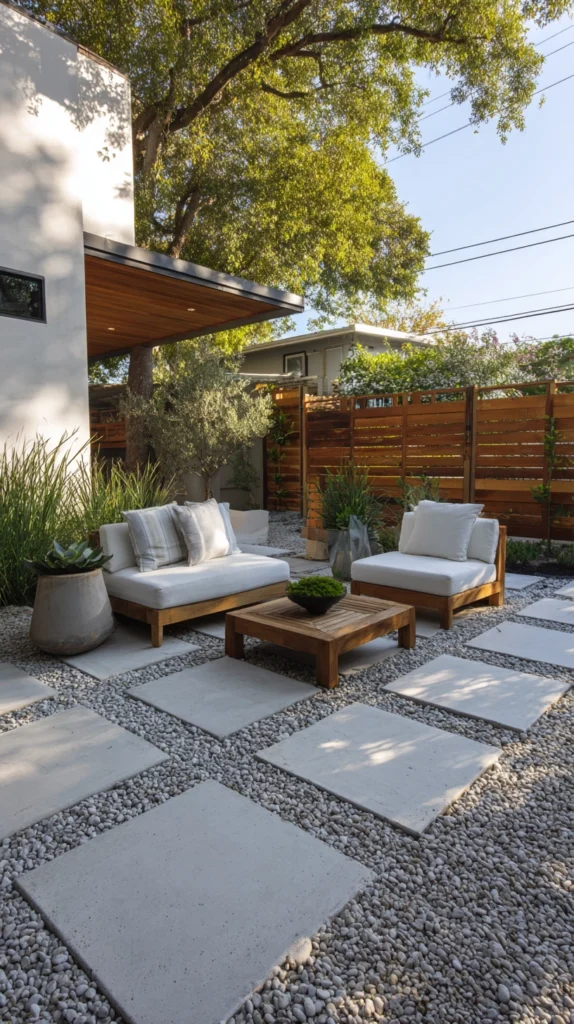
The foundational surface most mid-century backyards were built around.
Build it:
- Basic square or rectangular concrete pavers, laid in a simple grid pattern directly into a sand or gravel base
- Grass or gravel left visible in the joints between pavers, a specific detail common to original mid-century patio design
- A border of contrasting gravel or a single row of larger pavers to define the patio’s edge cleanly
Why a simple paver grid is more historically accurate than an elaborate patio design:
- Original mid-century patios favored exactly this kind of unfussy, geometric simplicity, making a basic grid genuinely period-appropriate rather than a budget compromise
- Concrete pavers are among the most affordable hardscaping materials available, particularly compared to natural stone or poured decorative concrete
- A DIY installation is genuinely achievable for most homeowners with basic tools, unlike more technical hardscaping projects that require professional installation
Why the specific paver size and spacing matters more than people initially assume:
Mid-century patios typically used larger-format pavers, often 16 to 24 inches square, with generous spacing between them rather than small, tightly fitted pavers common in more traditional patio styles. This larger scale and visible grass or gravel joint is a specific, recognizable detail that instantly reads as mid-century rather than generic. Sourcing pavers in this larger format, even in the most basic plain gray concrete, does more to establish the aesthetic than a smaller paver size ever would, regardless of material quality.
Cost breakdown: Basic concrete pavers run $2 to $5 per square foot, with a DIY installation for a modest patio typically totaling $200 to $500 in materials.
2. Breeze Block Privacy Screens
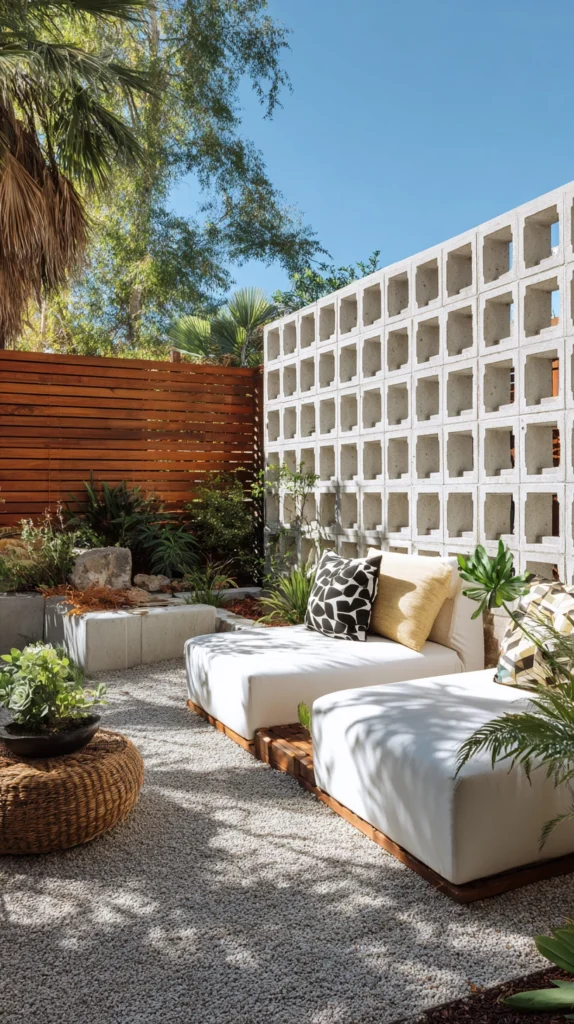
A specific architectural element almost synonymous with the entire aesthetic.
Build it:
- Decorative concrete breeze blocks, stacked and mortared into a simple screen wall along one side of the yard
- Positioned to block a specific unwanted view or provide privacy from a neighboring property, rather than enclosing the whole yard
- Left in natural gray concrete, or painted a single solid color for a more contemporary take on the original material
Why breeze block screens are one of the most recognizable mid-century backyard elements available:
- The distinctive geometric perforated pattern is instantly associated with the era, more so than almost any other single material choice
- It provides genuine privacy and wind-breaking function while still allowing light and airflow through the perforations
- It’s considerably more affordable than a solid privacy fence of comparable height, since the blocks themselves are a basic, mass-produced material
Why sourcing original or reproduction blocks affects both authenticity and cost:
Genuine vintage breeze blocks, salvaged from demolished mid-century structures, carry the most authentic character but can be more difficult to source in large enough quantities for a full screen wall. Modern reproduction breeze blocks, widely manufactured and sold at standard building supply stores, offer a close enough visual match for most budget-conscious projects, and are considerably easier to source in bulk. For most people building this feature on a budget, new reproduction blocks deliver excellent value without the sourcing challenge of hunting down enough matching vintage pieces.
Cost breakdown: Breeze blocks run $3 to $6 each, with a modest screen wall section typically requiring 40 to 80 blocks, totaling $150 to $500 depending on wall size.
3. Hairpin Leg Outdoor Furniture
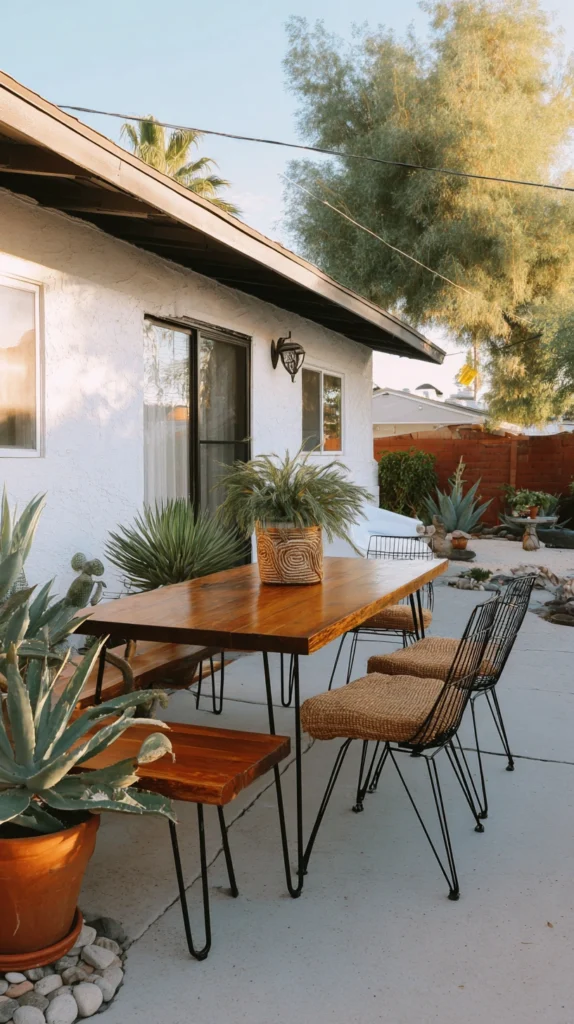
Repurposing or building furniture around one of the era’s most recognizable structural details.
Build it:
- Simple wood tabletops or bench seats paired with thin, angled hairpin metal legs
- Legs purchased as hardware separately and attached to a DIY-built wood top, rather than buying a fully assembled piece
- A weatherproof sealant applied to the wood top, since this furniture style will need protection from outdoor exposure
Why hairpin legs deliver outsized mid-century character for relatively little cost:
- The thin, angled metal leg is one of the most recognizable structural signatures of the entire era, appearing across countless original furniture pieces
- Purchasing legs as hardware and building the tabletop yourself is considerably cheaper than buying a fully finished piece of furniture in this style
- It works across a wide range of furniture types, from a simple side table to a full outdoor dining table, using the same basic technique
Why building rather than buying this specific furniture style makes the most financial sense:
Furniture retailers selling complete hairpin-leg pieces, especially those marketed specifically as mid-century style, often charge a significant premium for the aesthetic itself rather than for genuinely superior materials or construction. Since the hairpin leg hardware itself is inexpensive and widely available, and building a simple wood tabletop requires only basic tools and lumber, most people can build a very close equivalent to a $300 retail piece for well under half that cost, simply by sourcing the components separately and assembling them at home.
Cost breakdown: Hairpin legs run $8 to $15 per leg, with a basic wood tabletop adding $20 to $60 depending on size and wood type, totaling $50 to $150 for a complete table or bench.
4. A Simple Slatted Wood Privacy Fence or Screen
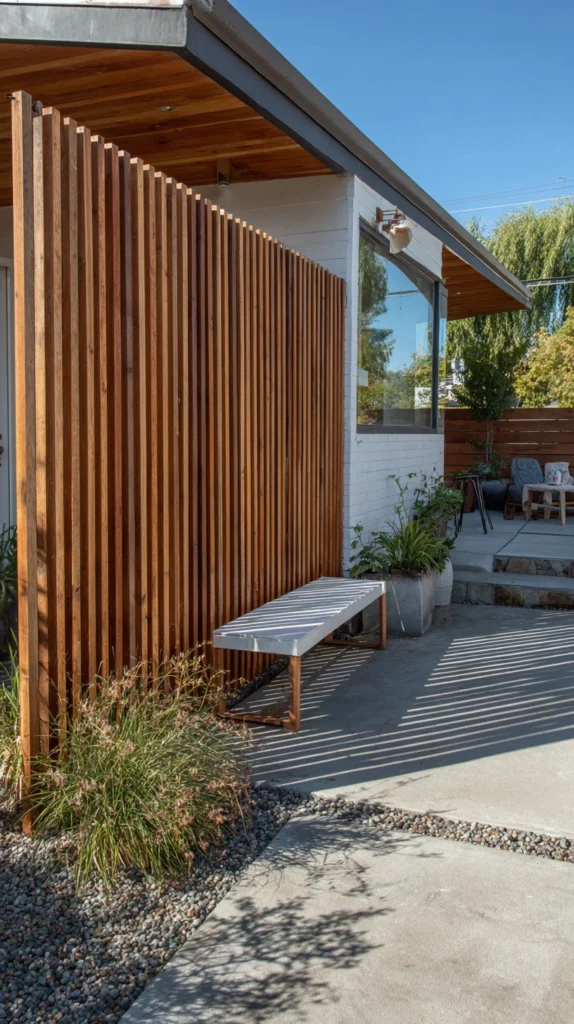
Vertical wood slats spaced for both privacy and airflow, a defining structural pattern of the era.
Build it:
- Thin wood slats, either cedar or pressure-treated pine, installed vertically with consistent gaps between each board
- Mounted to a simple frame rather than requiring a full traditional fence post and rail structure
- Left unstained for a natural weathered look, or finished in a single solid stain color for a more current take
Why slatted screens are more budget-friendly than a solid privacy fence:
- Spacing slats apart rather than installing them flush uses considerably less lumber than a fully solid fence covering the same area
- The gapped construction allows airflow through, reducing wind load on the structure and making it more stable in a DIY build
- It’s one of the more straightforward carpentry projects on this list, requiring only straight cuts and consistent spacing rather than complex joinery
Why the specific spacing ratio between slats affects how authentically mid-century the result reads:
Original mid-century slatted screens typically used a spacing ratio where the gap between slats was roughly equal to or slightly narrower than the slat’s own width, creating a balanced, evenly rhythmic pattern rather than either a nearly solid wall or an overly open, sparse screen. Getting this proportion right, and maintaining it consistently across the full length of the screen, does more to make the finished project read as genuinely period-appropriate than the specific wood species or finish chosen.
Cost breakdown: A slatted wood privacy screen runs $8 to $15 per linear foot in materials for a DIY build, considerably less than a comparable solid privacy fence.
5. Boomerang or Kidney-Shaped Garden Beds
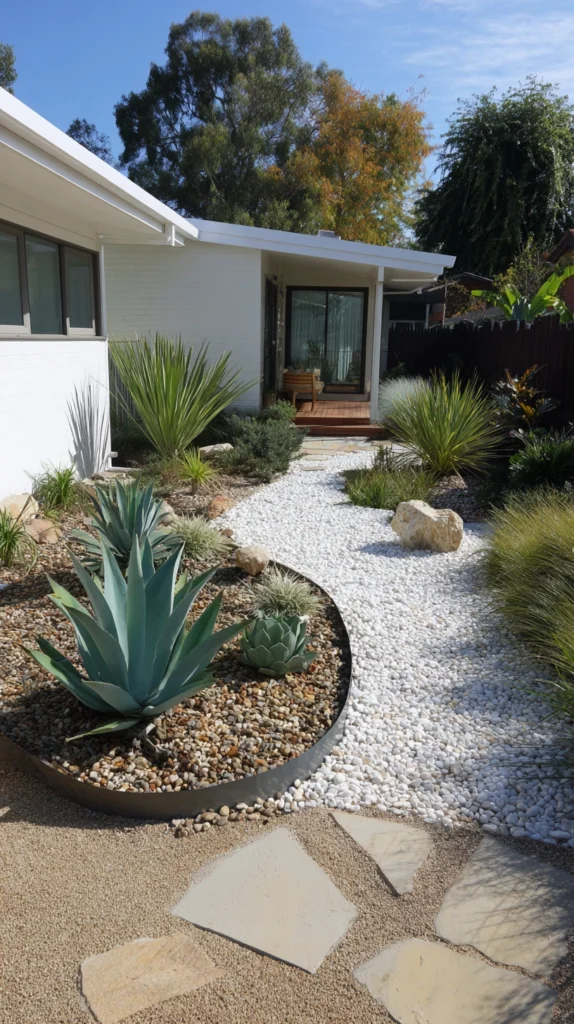
Organic curved shapes standing in deliberate contrast to the era’s otherwise rigid geometric lines.
Build it:
- Garden beds outlined in a boomerang or kidney shape rather than a standard rectangle, using a garden hose or rope to map the curve before digging
- Edged with simple metal or plastic garden edging material, bent to follow the curved outline
- Planted with a mix of drought-tolerant, structural plants like agave, yucca, or ornamental grasses common to mid-century landscaping
Why curved garden beds are a genuinely defining, recognizable mid-century landscaping element:
- The organic curve was a deliberate design counterpoint to the era’s otherwise geometric architecture, appearing in everything from coffee tables to swimming pool shapes
- It costs no more than a standard rectangular garden bed to create, since the shape itself doesn’t require any special material or additional expense
- It pairs naturally with the era’s typical plant palette, which favored structural, sculptural plants over soft, blowsy cottage-garden style plantings
Why plant choice matters as much as the bed’s shape in achieving this specific look:
A kidney-shaped bed planted with roses or soft perennials reads as a generic curved garden bed rather than a genuinely mid-century one. The era’s landscaping favored bold, architectural plants with strong sculptural form, like yucca, agave, and various ornamental grasses, specifically because these plants echoed the same clean structural lines found in the surrounding architecture and furniture. Choosing this specific plant palette, rather than a softer cottage garden mix, is what actually completes the mid-century reference, regardless of how well the bed’s shape itself is executed.
Cost breakdown: Garden edging material runs $1 to $3 per linear foot, with structural plants like yucca or ornamental grasses running $8 to $25 each depending on size.
6. A DIY Fire Pit With Simple Geometric Lines
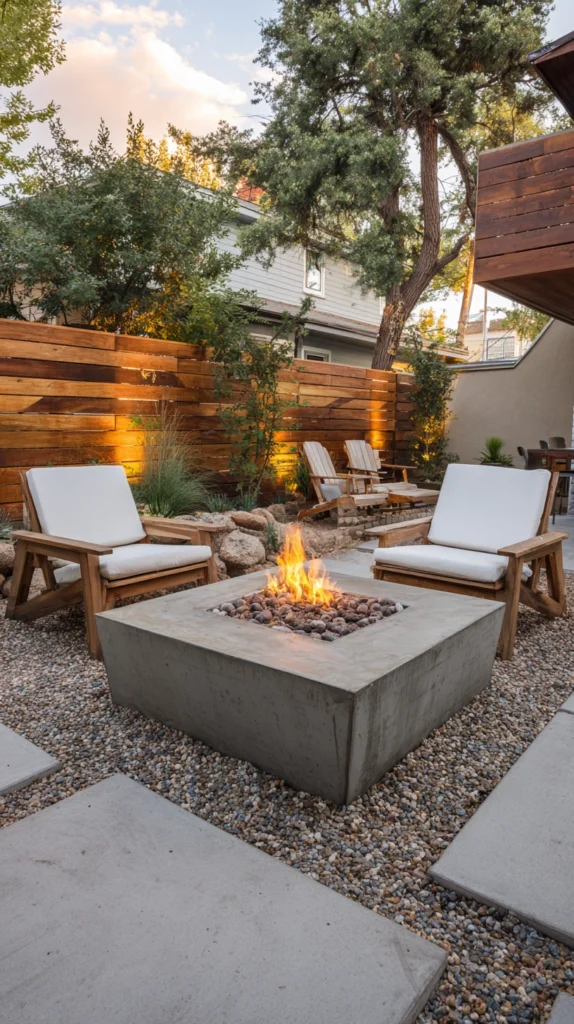
A gathering feature built with clean, unfussy shapes rather than an elaborate stacked-stone design.
Build it:
- A simple square or circular fire pit constructed from concrete blocks or poured concrete, kept deliberately plain and geometric
- A metal fire ring insert added for safety and easier cleanout, available inexpensively from most hardware stores
- Simple flat pavers or a gravel surround added at the base, echoing the same clean lines used elsewhere in the yard
Why a simple geometric fire pit suits both the aesthetic and the budget:
- Elaborate stacked natural stone fire pits, while attractive, work against the clean-lined mid-century aesthetic and typically cost considerably more in materials
- A basic concrete block or poured design is one of the more affordable DIY hardscaping projects available, requiring minimal specialized skill
- The unfussy, geometric shape is genuinely more period-appropriate than a rustic stacked-stone alternative, making the budget-friendly option also the more authentic one
Why avoiding rustic stone details specifically improves the aesthetic accuracy of this project:
It’s a common instinct to reach for natural, irregular stone when building a DIY fire pit, since it’s associated with a classic, timeless backyard feature. For a mid-century aesthetic specifically, though, this instinct works against the intended look, since the era’s design language consistently favored smooth, geometric, manufactured materials over rustic, natural irregularity. Sticking with plain concrete block or a poured concrete form, rather than reaching for river stone or fieldstone, is what keeps this feature aligned with the broader style rather than accidentally drifting into a more generic rustic backyard look.
Cost breakdown: A basic concrete block fire pit runs $80 to $200 in materials, including a metal fire ring insert.
7. Atomic-Era Starburst or Geometric Wall Art
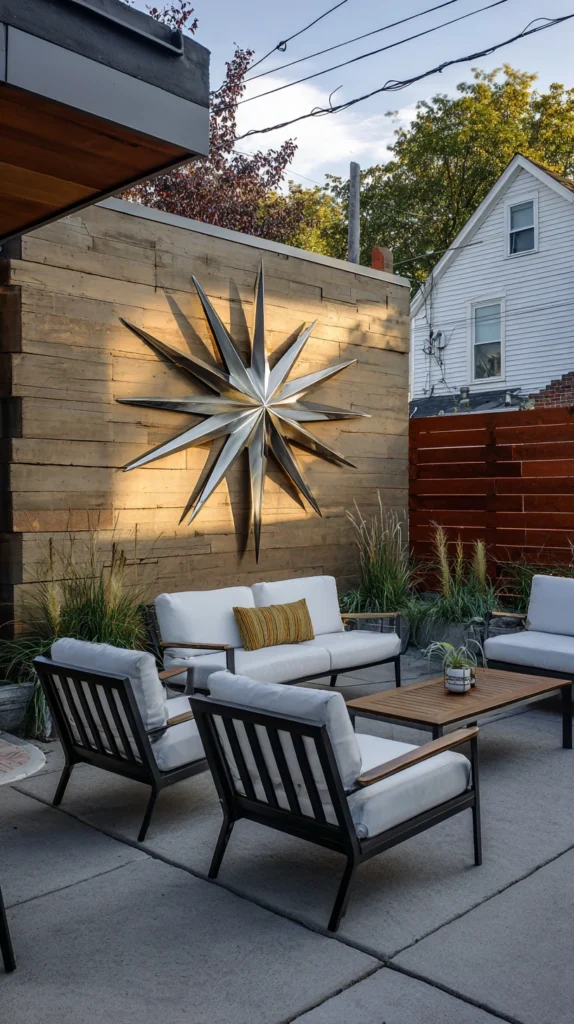
Small decorative details that reference the era’s iconic decorative motifs without requiring major construction.
Build it:
- A starburst-pattern wall hanging, either purchased inexpensively or built from painted wood dowels arranged in a radiating pattern
- Mounted on an exterior wall or fence section as a focal decorative point
- Painted in a single bold color, or left in natural wood tones depending on the yard’s overall palette
Why small decorative details like this add real character for very little cost:
- A single well-placed starburst or geometric motif signals the aesthetic clearly, even in a yard that hasn’t undergone major structural changes
- Building one from wood dowels and basic hardware costs a fraction of purchasing a similar piece from a retailer specifically marketing mid-century reproduction decor
- It’s one of the fastest projects on this list to complete, often finishable in a single afternoon
Why this kind of decorative detail matters more than people initially assume in a budget-conscious project:
When larger structural changes, like a full patio or fence rebuild, aren’t immediately affordable, smaller decorative details like an atomic starburst piece can establish the aesthetic direction of the whole yard well ahead of the bigger investments. It gives the space an immediate, visible reference point that ties everything else being planned back to the same design language, even if the larger hardscaping projects are still months or seasons away from being completed.
Cost breakdown: A DIY starburst wall piece runs $15 to $30 in wood dowels, hardware, and paint.
8. Simple A-Frame or Butterfly Roof Shade Structures
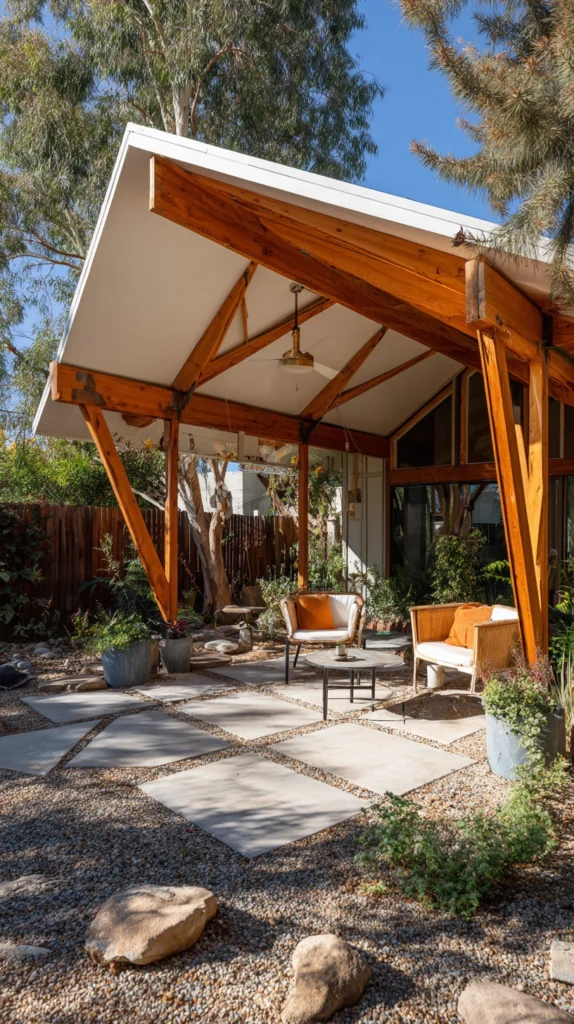
A shade structure echoing the era’s distinctive angular roof shapes rather than a standard flat pergola.
Build it:
- A small shade structure built with an angled A-frame or a butterfly roof shape, where two roof planes meet at a low central point or slope in opposite directions
- Constructed from basic dimensional lumber, kept unpainted or finished in a single solid stain color
- Sized modestly, covering a small seating area rather than attempting a full-yard structure on a limited budget
Why an angled roof shape reads as more period-appropriate than a standard flat pergola:
- The butterfly and A-frame rooflines were genuinely distinctive architectural signatures of mid-century residential design, appearing on everything from carports to full homes
- A smaller-scale version built specifically as a yard shade structure references this architectural detail without requiring a full building permit or major construction investment
- The angled shape is often structurally simple to build using basic lumber and standard joinery techniques, keeping the DIY project approachable
Why scaling this structure down to a modest size still delivers genuine aesthetic impact:
A full butterfly-roof structure covering an entire patio is a significant undertaking, but the same angular roofline applied to a small structure, covering just a bench or a single seating nook, still reads clearly as the same architectural reference. Scaling the ambition down to match the actual available budget doesn’t diminish how recognizably mid-century the finished structure looks, since the angle and shape itself, not the size, is what carries the aesthetic signal.
Cost breakdown: A small-scale angled shade structure runs $150 to $400 in lumber and hardware for a DIY build covering a modest seating area.
9. Thrifted and Refinished Vintage Outdoor Furniture
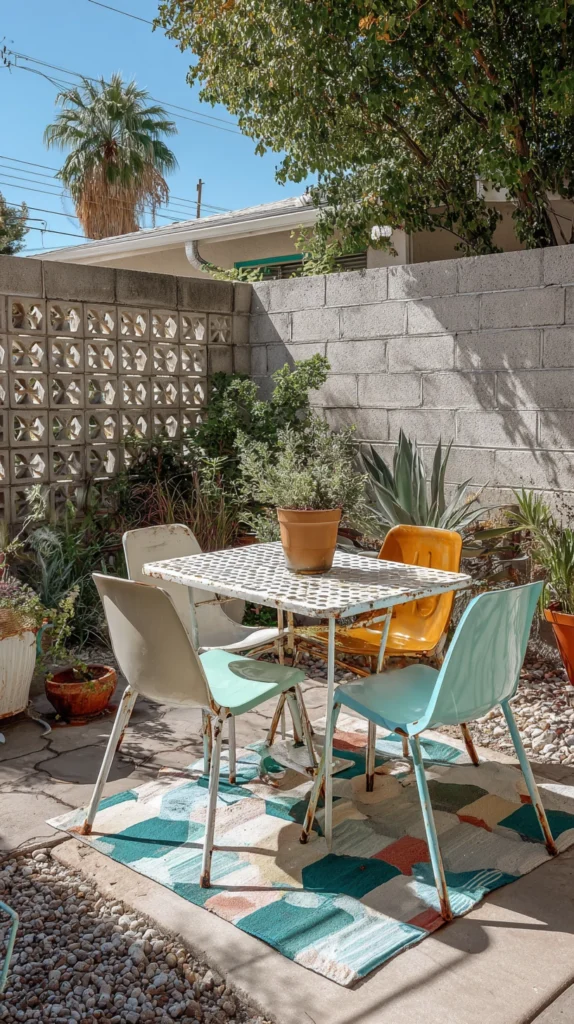
Sourcing genuine period pieces secondhand rather than buying new reproductions.
Build it:
- Vintage metal or wood outdoor furniture sourced from estate sales, thrift stores, or online marketplaces
- Surface rust or peeling paint removed and refinished with a fresh coat of exterior-rated paint or a clear protective sealant
- Cushions replaced with simple, solid-colored outdoor fabric if the original cushions are too worn to salvage
Why thrifted vintage pieces often deliver more authentic character than new reproductions:
- Genuine vintage furniture carries real material and construction quality specific to the era, something modern reproductions can only approximate
- Secondhand pricing is typically a small fraction of what an equivalent new reproduction piece costs at retail
- Refinishing and reupholstering existing pieces is usually more affordable than purchasing new furniture, even accounting for the labor and materials involved
Why patience in sourcing matters more with this specific strategy than with any other on this list:
Building a full mid-century outdoor furniture collection through thrifting is inherently a gradual process, since finding genuinely well-priced vintage pieces in good structural condition takes time and repeated searching rather than a single shopping trip. This approach rewards people willing to check estate sales, thrift stores, and online marketplaces consistently over weeks or months, gradually assembling a full seating and dining set piece by piece, rather than trying to source everything at once, which typically means paying more for the convenience of a complete matching set found in one place.
Cost breakdown: Individual thrifted outdoor furniture pieces run $10 to $60 each depending on condition and material, with refinishing supplies adding $15 to $40 per piece.
10. A Gravel Zen Garden or Minimalist Rock Feature
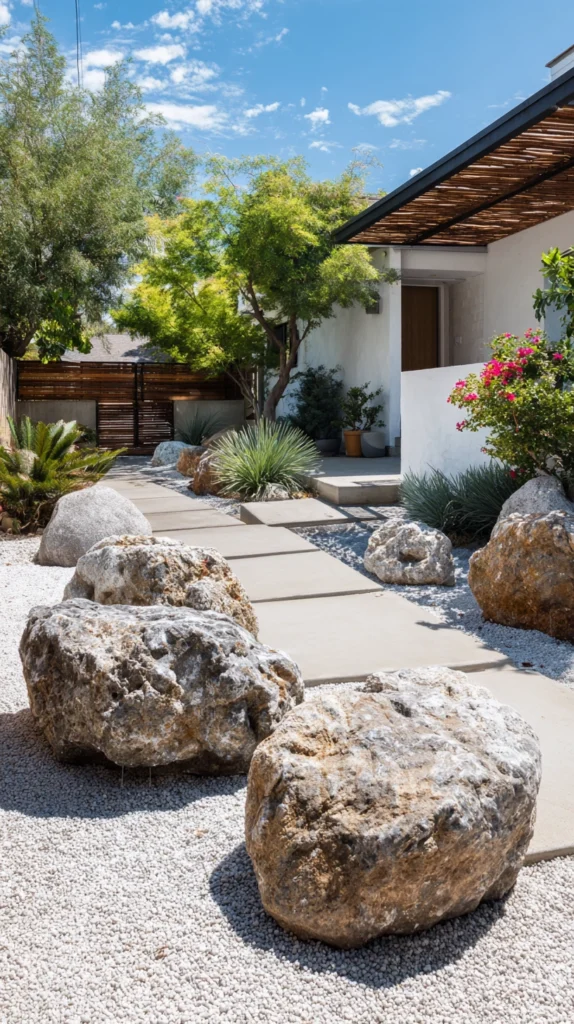
A low-cost landscaping feature echoing the era’s affinity for minimalism and Japanese design influence.
Build it:
- A defined section of the yard filled with raked gravel, bordered by a simple wood or metal edge
- A small number of larger accent rocks or boulders placed deliberately within the gravel area, rather than scattered randomly
- Landscaping fabric installed beneath the gravel to prevent weed growth from disrupting the clean, minimal look over time
Why a gravel feature suits both the aesthetic and a genuinely tight budget:
- Gravel is one of the least expensive ground cover materials available, considerably cheaper than sod, mulch, or paving for the same square footage
- The minimalist, low-maintenance design directly echoes the era’s broader interest in Japanese and Scandinavian design influences
- It requires very little ongoing maintenance once installed, unlike a planted garden bed that needs regular watering and care
Why the specific placement of accent rocks matters more than the gravel itself:
A gravel area alone, without any deliberate rock placement, can read as an empty, unfinished patch of yard rather than an intentional design feature. The mid-century and Japanese-influenced minimalist garden tradition specifically relies on careful, asymmetrical rock placement, often in odd-numbered groupings, to create genuine visual interest within an otherwise sparse material. Taking the time to place even just three or five larger rocks thoughtfully, rather than simply filling the whole area with uniform gravel, is what elevates this from a plain gravel patch into a genuine design feature.
Cost breakdown: Gravel runs $30 to $60 per cubic yard, with landscaping fabric adding $10 to $20, and accent rocks costing $5 to $30 each depending on size if not sourced for free from the property itself.
11. Simple Pendant String Lighting in a Geometric Pattern
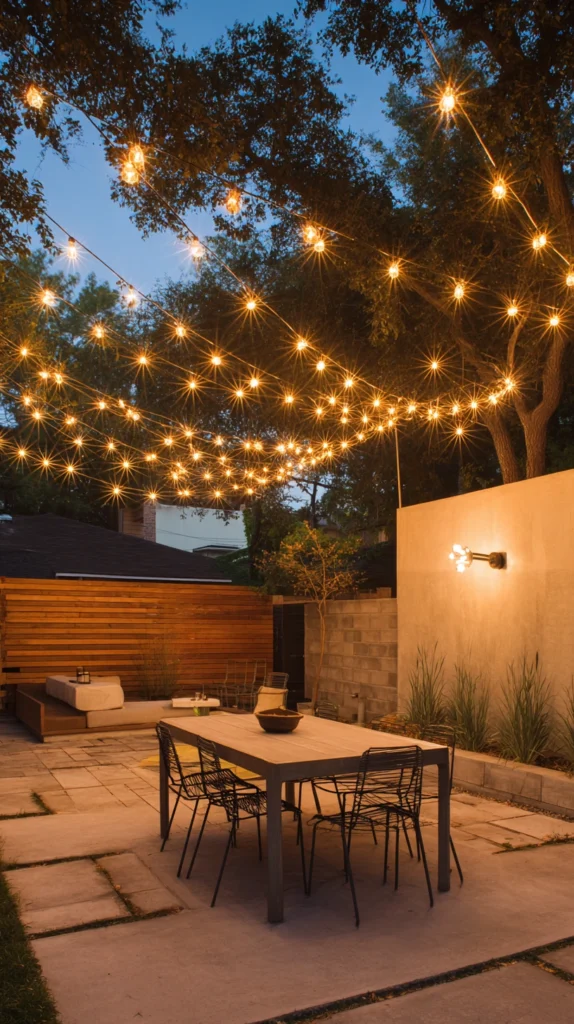
Overhead lighting arranged in a deliberate geometric layout rather than a casual scatter pattern.
Build it:
- Basic outdoor-rated string lights, strung in straight lines or a simple grid pattern across the yard’s main seating area
- Mounted using simple hooks or eyelets on existing structures, like a fence, house eave, or a single central post
- Warm-toned bulbs chosen to complement the era’s typical warm wood tones rather than a stark, cool white light
Why a geometric lighting layout suits the aesthetic more than a casual, organic string light arrangement:
- Straight-line or grid patterns echo the same clean, structured geometry found throughout mid-century architecture and furniture design
- It’s one of the most affordable ways to add genuine evening ambiance to a budget backyard project
- It requires no permanent structural changes, making it one of the lowest-commitment projects on this entire list
Why the specific pattern chosen changes how the whole space reads at night:
A casually draped, organically looped string of lights reads as more bohemian or eclectic than mid-century, since that loose, informal style works against the era’s preference for order and geometric structure. Stringing the same lights in clean parallel lines, or in a deliberate grid suspended between fixed points, keeps the lighting consistent with the rest of the yard’s aesthetic direction, turning a genuinely inexpensive addition into one that reinforces rather than undercuts the overall design goal.
Cost breakdown: Outdoor string lights run $20 to $40 per 48-foot strand, with mounting hardware adding $10 to $20.
12. A Small Reflecting Pool or Water Feature in a Geometric Shape
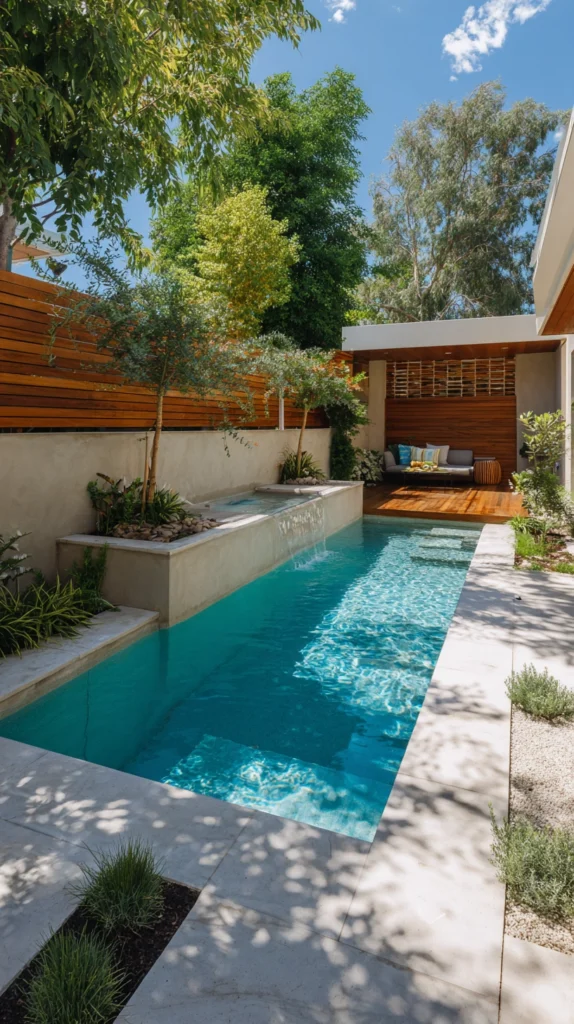
A water feature built in a simple rectangular or circular form rather than an elaborate natural-style pond.
Build it:
- A small, shallow reflecting pool built from a preformed liner or simple poured concrete, kept in a clean rectangular or circular shape
- A simple pump and fountain jet added if moving water is desired, or left completely still for a genuine reflecting pool effect
- Positioned to reflect an existing tree, the sky, or a piece of the yard’s architecture, reinforcing the era’s interest in framed views and reflection
Why a simple geometric water feature suits this budget-conscious project better than an elaborate pond:
- A basic preformed liner is considerably less expensive than excavating and lining an irregularly shaped natural pond
- The clean geometric shape is directly in line with the era’s broader design language, unlike a naturalistic pond style that would read as a different aesthetic entirely
- Even a small, shallow feature delivers meaningful visual impact through reflection alone, without requiring the cost of fish, extensive planting, or complex filtration systems
Why choosing stillness over movement often produces a more period-appropriate result:
While a bubbling fountain feature has broad appeal, the specific mid-century interest in water was often centered on reflection and stillness, drawing inspiration from Japanese garden design and the clean, mirror-like surfaces found in period architecture. A small, still reflecting pool, rather than an active bubbling fountain, more directly channels this specific design influence, and also happens to require less ongoing maintenance and no pump replacement costs over time.
Cost breakdown: A small preformed pool liner runs $40 to $120 depending on size, with an optional pump and fountain jet adding $30 to $70.
13. Painted Concrete or Terrazzo-Look Flooring Refresh
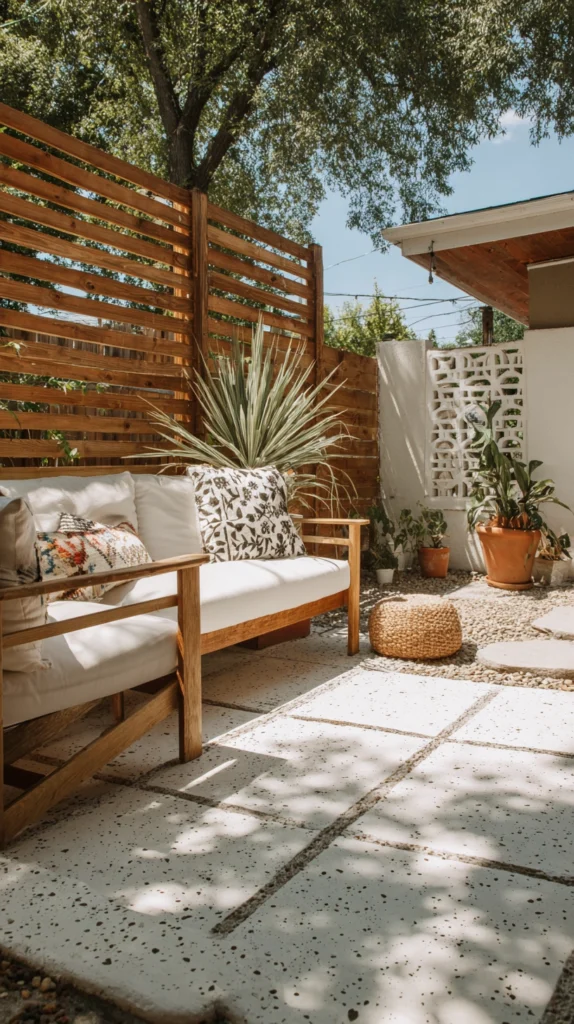
Updating an existing plain concrete patio rather than replacing it entirely.
Build it:
- An existing plain concrete patio cleaned thoroughly and prepared with a concrete etching solution before painting
- A concrete floor paint or stain applied in a solid color, or a terrazzo-look speckled finish achieved with a specialty paint product
- A protective sealant applied over the finished color to extend its durability against outdoor weather exposure
Why refreshing existing concrete is one of the most budget-effective projects on this entire list:
- It uses a patio surface that’s already in place, avoiding the considerably higher cost of full patio replacement or new paver installation
- A terrazzo-look speckled finish specifically references another material closely associated with mid-century design, achieved here at a fraction of real terrazzo’s cost
- It’s an achievable weekend DIY project for most homeowners, requiring no specialized equipment beyond basic painting tools
Why terrazzo specifically carries strong mid-century associations worth referencing even in painted form:
Genuine terrazzo flooring, a mix of marble or stone chips set into concrete and polished smooth, was a hallmark surface material in countless mid-century commercial and residential buildings, prized for its durability and distinctive speckled appearance. While installing real terrazzo is far beyond most backyard budgets, specialty concrete paints designed to mimic this speckled look can transform an existing plain gray patio into something that visually echoes this iconic material, delivering genuine aesthetic reference at a small fraction of the real material’s cost.
Cost breakdown: Concrete etching solution and specialty terrazzo-look paint run $60 to $150 depending on patio size, considerably less than any patio replacement option.
Getting started this weekend
You don’t need every element built before the yard starts reading as genuinely mid-century.
- Start with a small decorative detail, like a DIY starburst piece or geometrically patterned string lights, to establish the aesthetic direction immediately
- Add a larger DIY project, like a breeze block screen or a simple concrete paver section, once the smaller details have confirmed the overall direction feels right
- Save bigger structural builds, like an angled shade structure or a full fire pit, for a dedicated project once the budget and time allow
Most backyards that successfully achieve this look got there gradually, prioritizing the shapes and materials that actually define the era over expensive furniture brands associated with it.
Budget reality
A mid-century modern backyard can be built almost entirely through DIY projects and secondhand sourcing.
- Under $100: Starburst wall art, string lighting, a small reflecting pool liner
- $100-300: Breeze block screen section, hairpin leg furniture, a slatted wood privacy screen
- $300-600: Concrete paver patio, DIY fire pit, an angled shade structure
- $600+: A combination of several larger projects completed together across one season
Most of the authentic character comes from the specific shapes and materials chosen, not the total amount spent achieving the look.
What actually makes a backyard read as mid-century modern, regardless of budget
It was never really about owning original designer furniture or an unlimited landscaping budget.
It’s the breeze block screen letting light filter through in its distinctive perforated pattern, the hairpin legs holding up a simple wood tabletop, the kidney-shaped garden bed planted with structural yucca instead of soft cottage flowers.
Focus the budget on the shapes and materials that actually define the era, source secondhand and build what you can yourself, and the aesthetic holds up regardless of how modest the overall spending stayed.